Wort Chilling: No-Chill, Plate, and Immersion Methods.
I’ve screwed up enough batches to know this: the moment you turn off the flame under your brew kettle, the clock starts ticking.
You have boiling wort sitting there, full of sugars and proteins, and it wants to cool down to fermentation temperature (around 65°F for most ales).
The problem is the zone between 120°F and 80°F. That’s where wild yeast and bacteria throw a party.
If your wort hangs out there for hours, you’re asking for off-flavors or worse.
The question is not whether you should cool it. The question is how fast, how clean, and how much water you’re willing to waste.
When I started brewing in my garage, I thought I could just set the kettle outside and wait. Bad idea.
It took four hours to cool 5 gallons, and the batch tasted like wet cardboard.
I learned the hard way that thermodynamics doesn’t care about your patience.
Heat transfer depends on surface area, temperature difference, and flow.
You can either work with those variables or fight them. I chose to work with them.
This guide covers three methods: immersion chillers, no-chill brewing, and plate or counterflow chillers.
Each one has trade-offs.
I’ll also talk about water conservation and explain how to deal with warm tap water in the summer when your groundwater is already 75°F.
Immersion Chillers: The Simple Coil
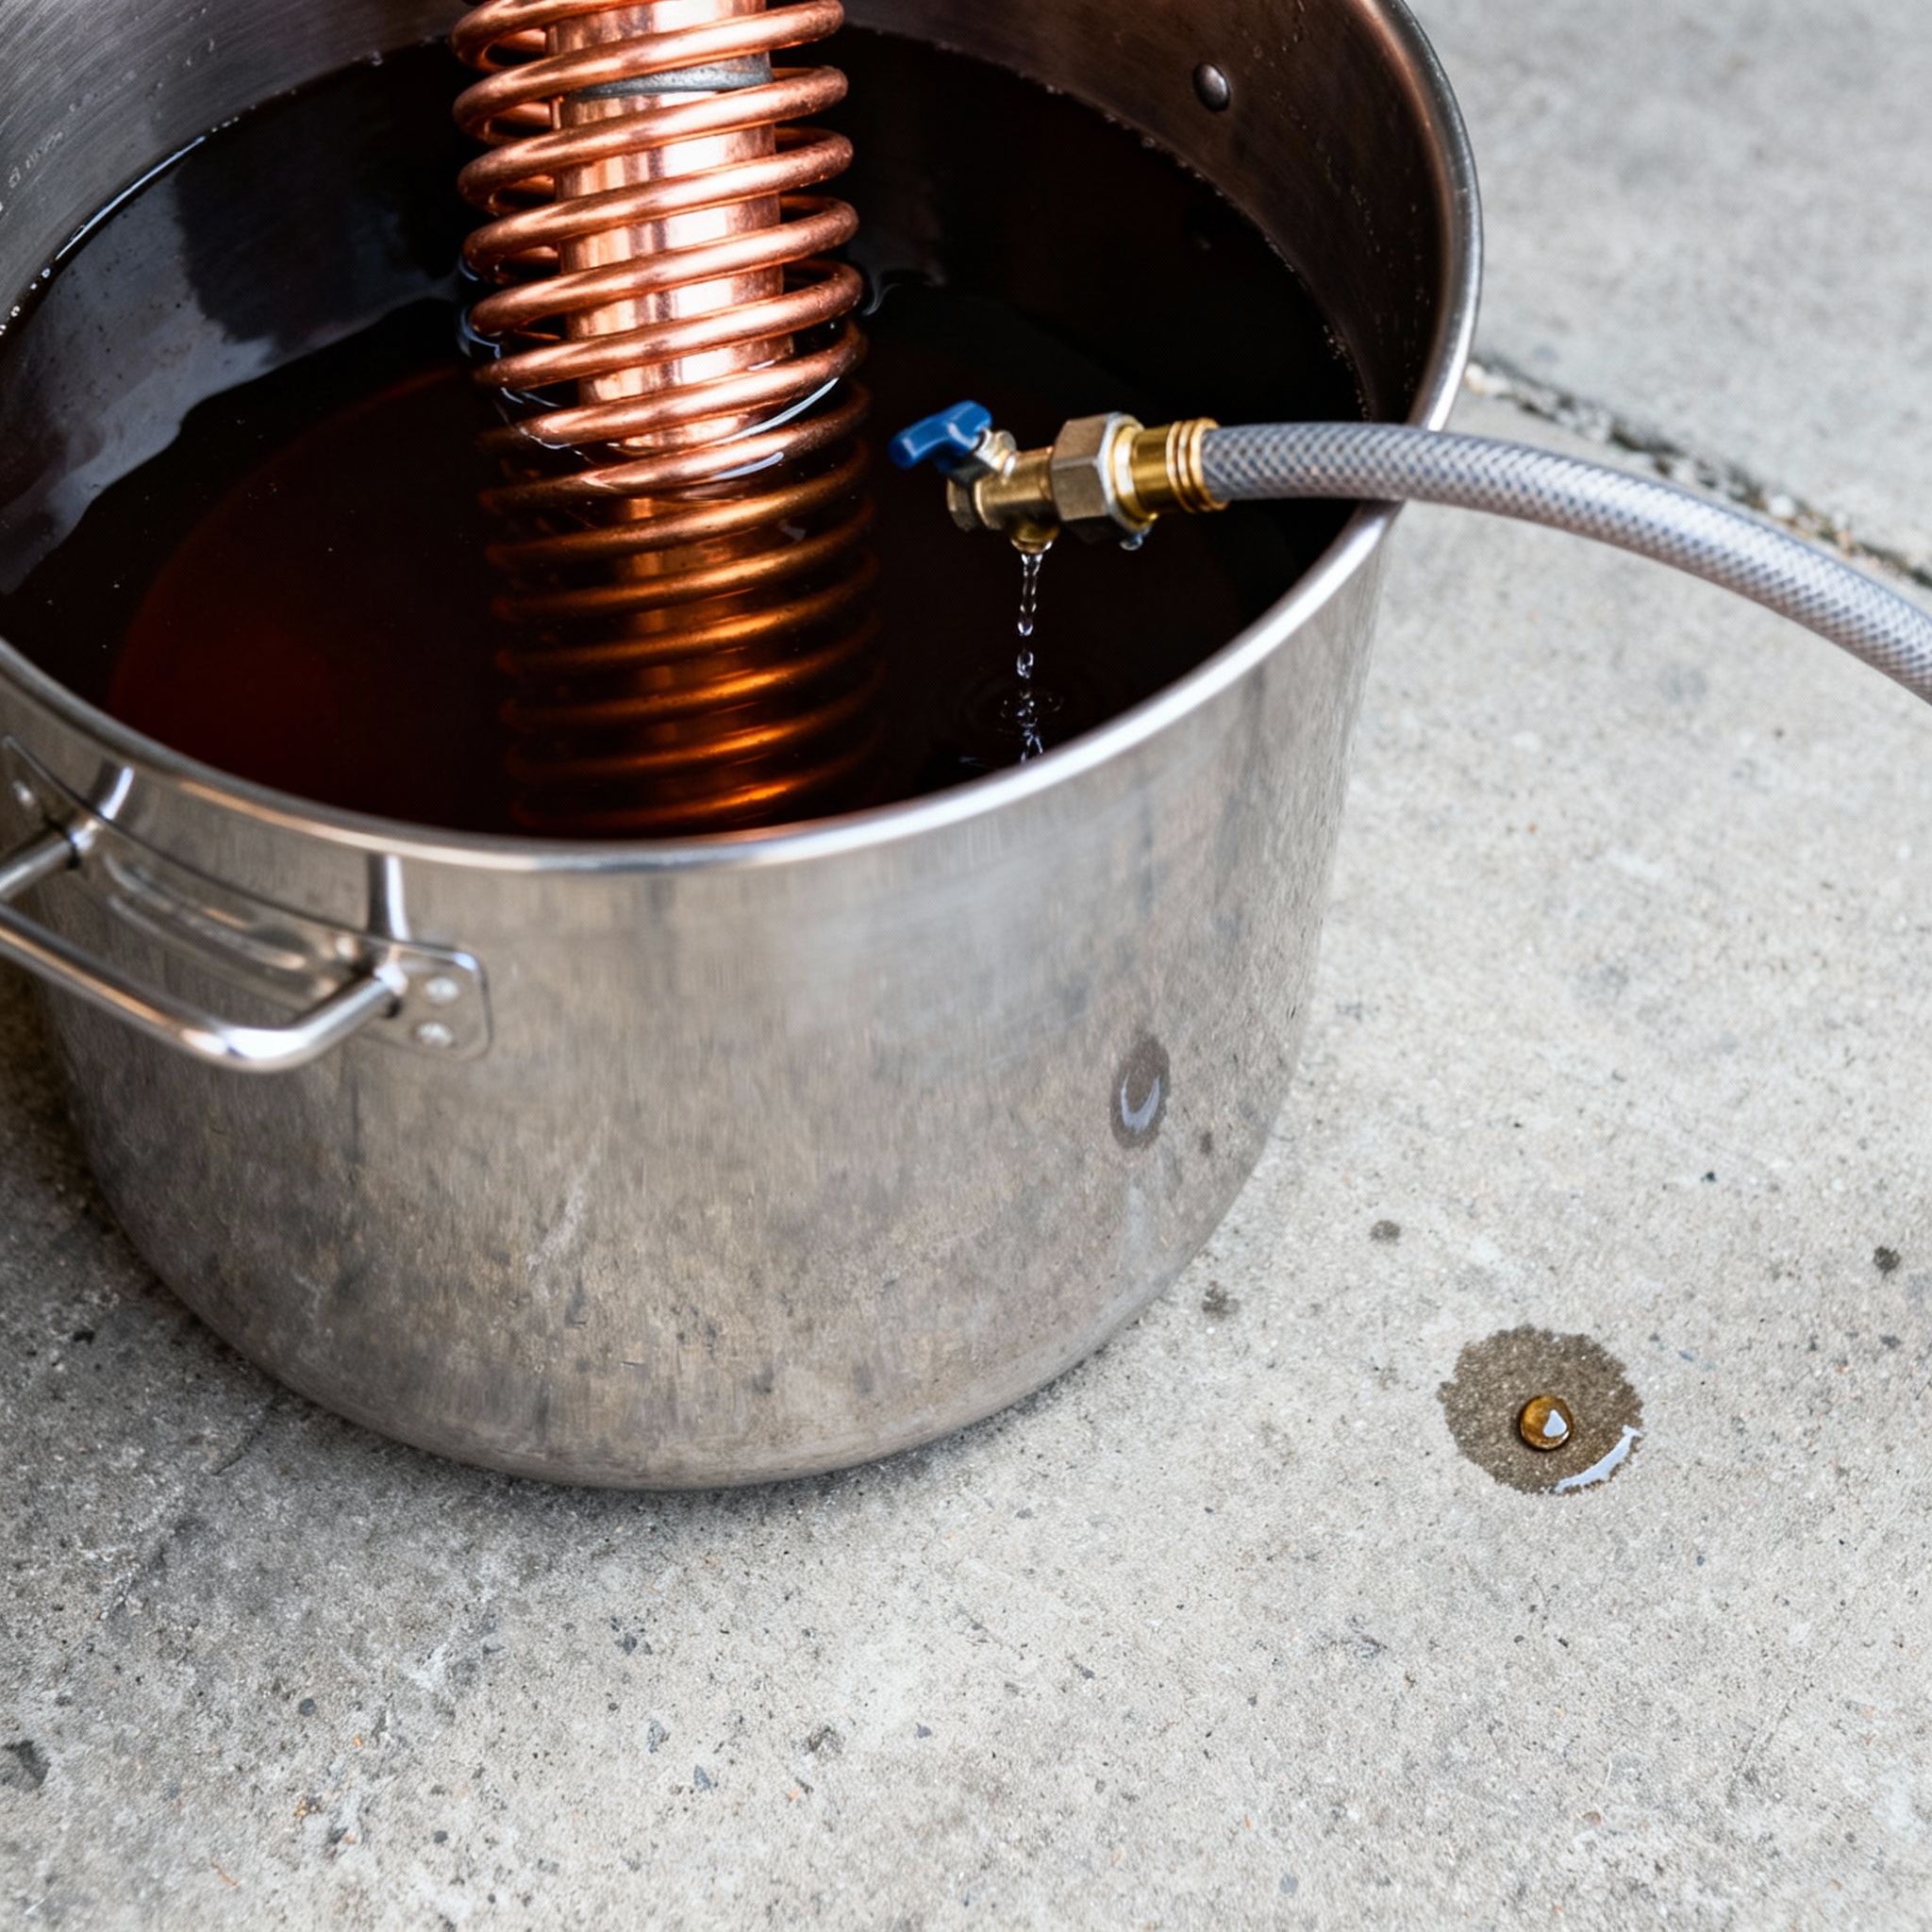
An immersion chiller is a coil of copper or stainless steel tubing that you drop into the hot wort.
You run cold water through it, and the wort cools down.
It’s the most common method for homebrewers because it’s simple, hard to break, and you can see what’s happening.
I built my first one out of 25 feet of half-inch copper tubing from the hardware store. It cost me about 40 dollars.
I bent it into a spiral, attached vinyl hoses to the ends, and sanitized it by dunking it in the boiling wort for the last 10 minutes of the boil.
The physics here is conduction. Heat moves from the hot wort into the cold water inside the coil.
The bigger the temperature difference, the faster it moves.
The problem is that as the wort cools, the temperature difference shrinks, and the transfer slows down.
After about 10 minutes, you hit a plateau where the wort is still warm but the chiller is barely doing anything.
That’s where most people give up and pitch their yeast too early.
The trick is turbulence.
If you stir the wort around the coil, you break up the boundary layer of warm liquid that forms on the copper surface.
That warm layer is insulation. It slows everything down.
When I started stirring with a sanitized spoon (gently, in circles), my cooling time dropped from 30 minutes to 15 minutes.
The difference between still wort and moving wort is huge.
You also need to think about flow rate.
If you blast water through the chiller at full pressure, most of it exits before it can absorb much heat. You’re wasting water.
If you throttle it down to a trickle, the water picks up more heat per gallon, but the total heat transfer drops.
I found the sweet spot by feel. I run the tap at about half pressure.
The water coming out of the chiller should feel hot, not warm. If it’s only warm, you’re moving too much water too fast.
One more thing: coil length matters, but only up to a point.
I tested a 25-foot coil versus a 50-foot coil. The 50-footer cooled the wort 3 minutes faster.
The extra copper didn’t double the speed because by the time the water reaches the end of a long coil, it’s already warm.
Diminishing returns. If you’re building one, stick with 25 to 30 feet to save money.
Before you start chilling, run hot tap water (not cold) through the coil for 30 seconds. This pre-heats the copper and prevents thermal shock, which can cause pinhole leaks in cheap tubing.
No-Chill Brewing: The Australian Method
This is the method I use most often now. It’s going to sound insane if you’ve been taught that wort must cool immediately.
You don’t chill at all.
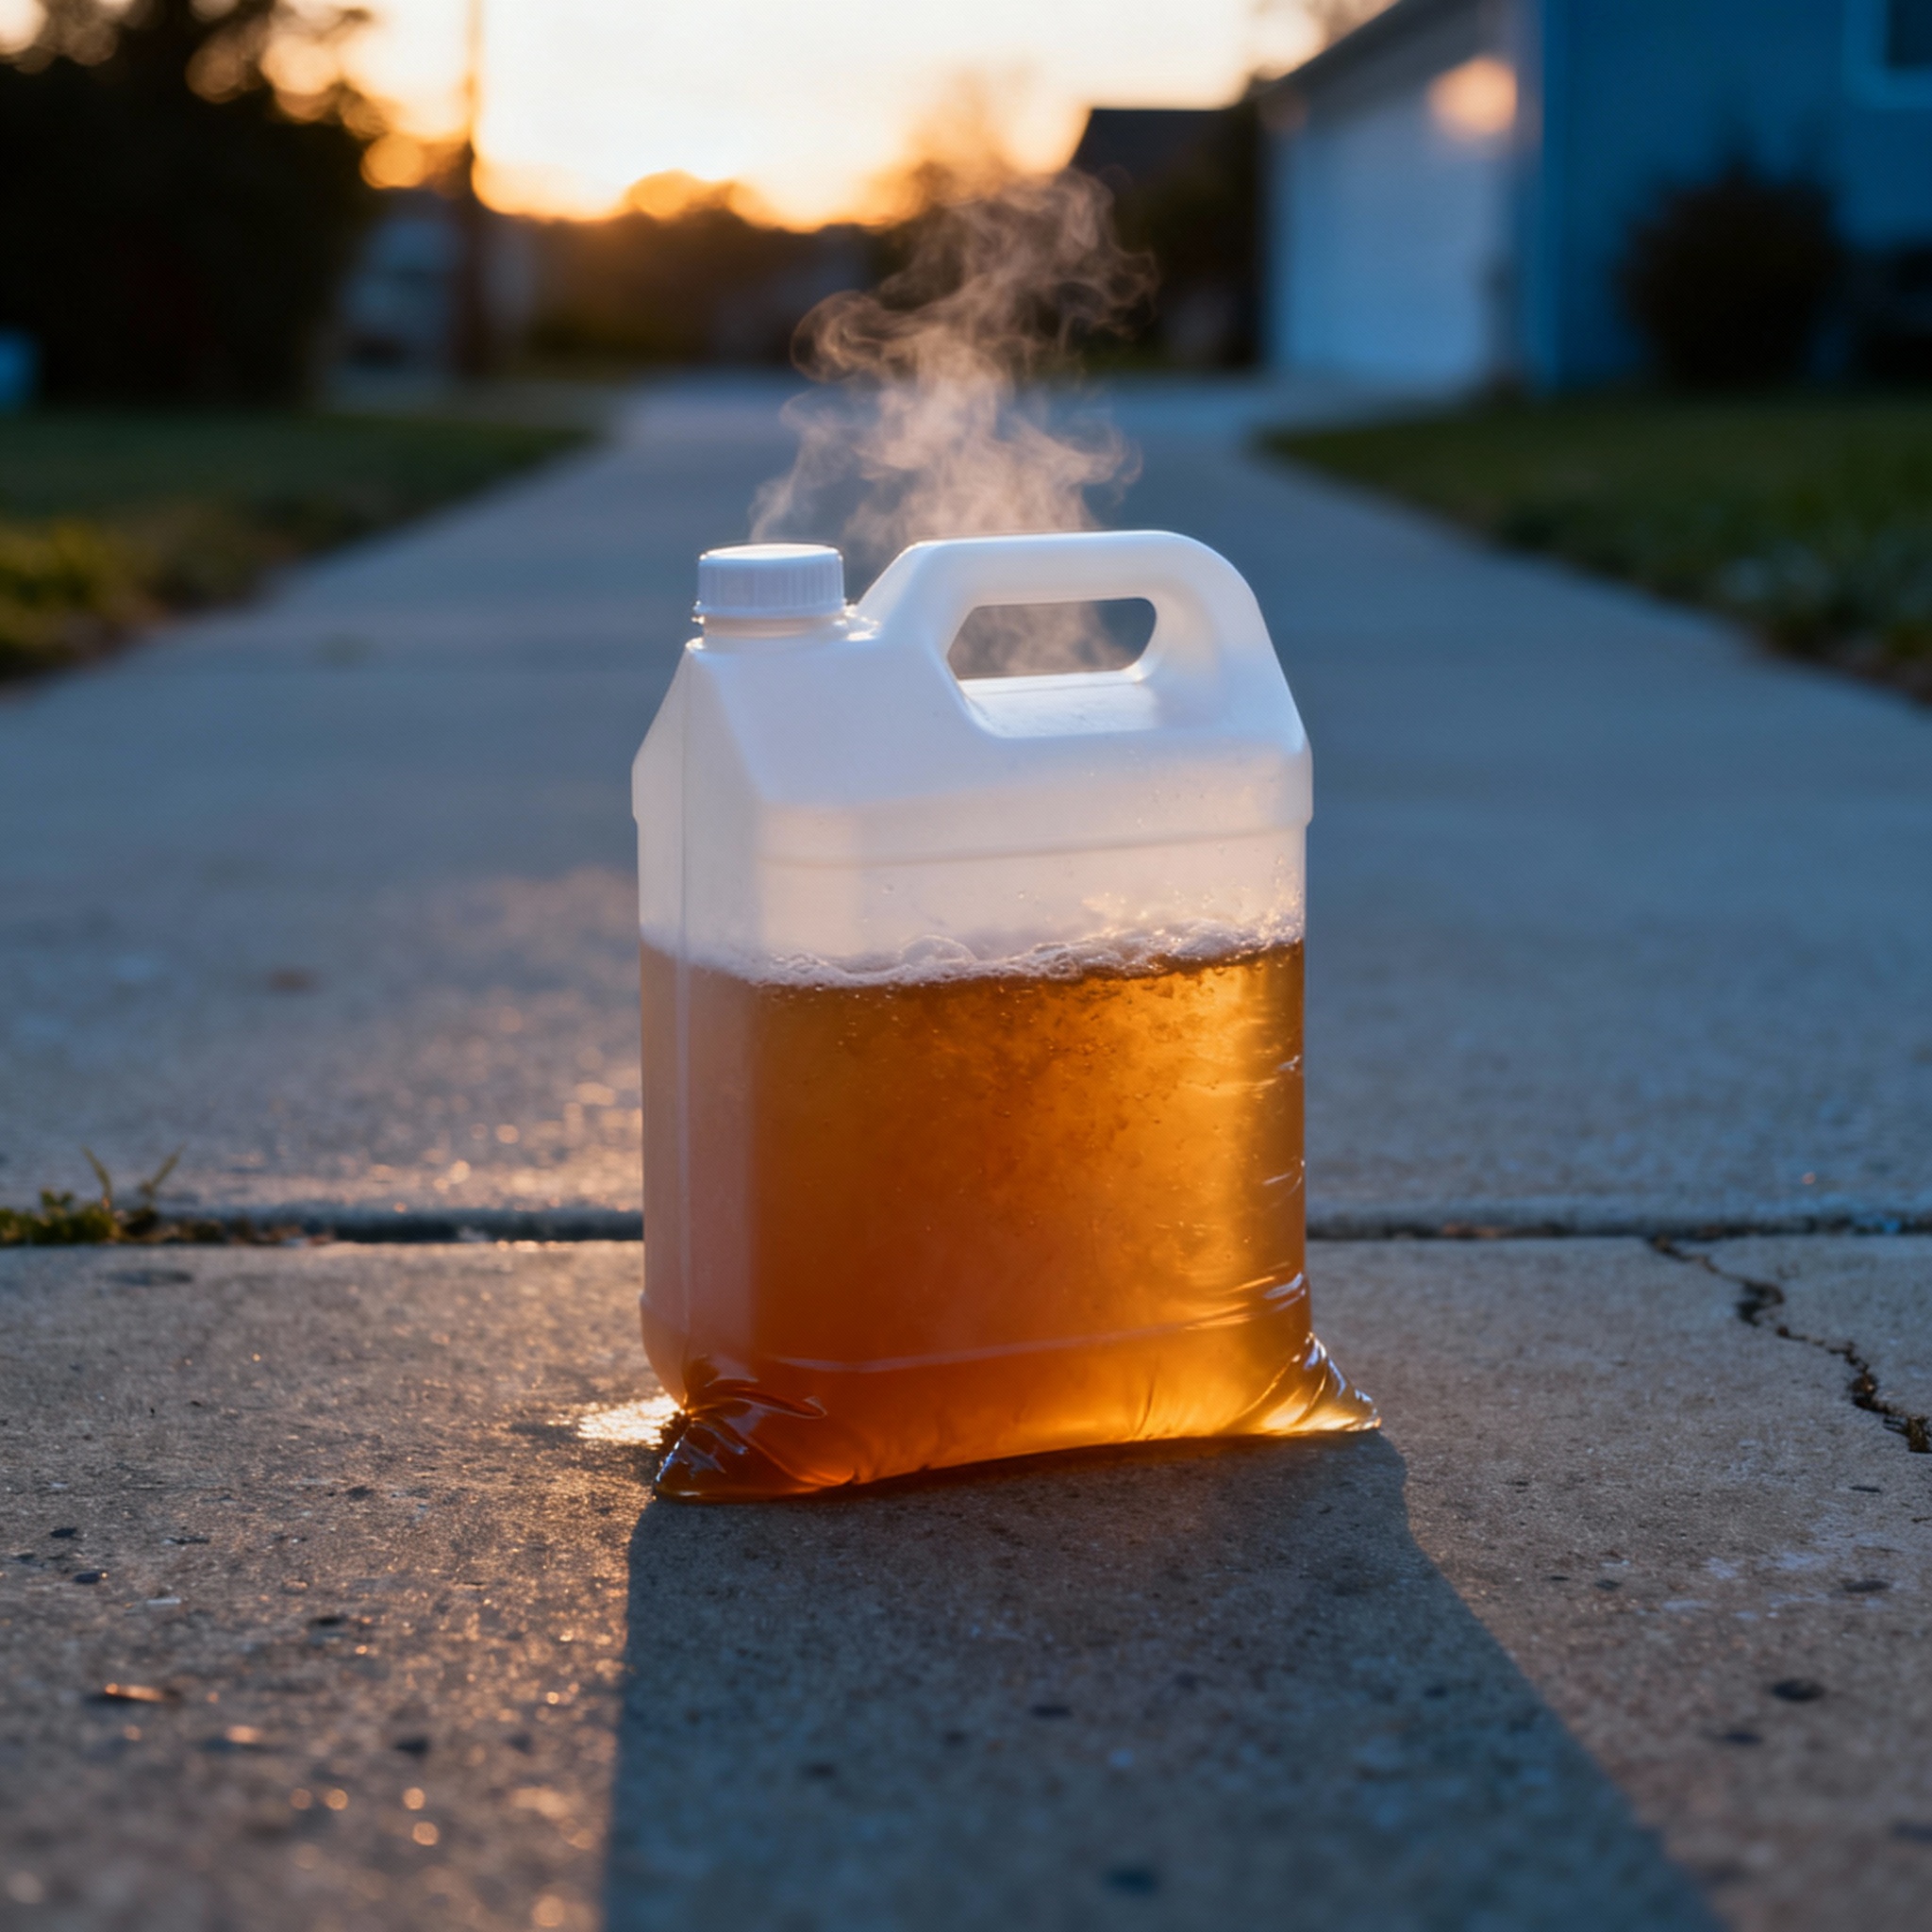
You transfer the boiling wort (212°F) into a sanitized plastic cube, squeeze out the air, seal it, and let it sit.
It cools overnight. You pitch yeast the next day or a week later. It saves water, saves time, and works.
I first read about this on an Australian homebrewing forum.
Water is expensive in parts of Australia, so brewers there figured out how to skip the chiller.
The key is the cube. You need a food-grade HDPE container.
I use 5-gallon cubes with screw-on lids. You fill the cube to the very top with boiling wort, squeeze out the headspace, and tighten the lid.
The cube puffs up like a balloon from the heat, then contracts as it cools.
The boiling wort sanitizes the inside of the cube. No oxygen gets in because there’s no headspace. Nothing can grow.
The thermodynamics here are passive conduction.
The wort cools by radiating heat into the air around the cube. It’s slow.
A 5-gallon cube takes about 12 hours to drop from 212°F to 70°F in my garage.
If you’re in a hurry, you can put the cube in a tub of cold water and knock that down to 6 hours.
I usually just leave it overnight and brew the night before I want to ferment.
The downside is hop utilization.
When you transfer boiling wort, the hops keep isomerizing for a while as the wort cools.
You get about 10 to 15 percent more bitterness than you would with rapid chilling.
I adjust my recipes by cutting back the bittering hops slightly. It’s not exact, but it works.
The other downside is DMS (dimethyl sulfide), which smells like cooked corn.
DMS forms from a compound called SMM, which breaks down during the boil.
If you chill fast, the SMM gets locked in and can’t convert.
If you no-chill, there’s a window where SMM can still turn into DMS as the wort cools.
Pilsner malt has the most SMM.
I’ve no-chilled plenty of pale ales and IPAs with no problem.
I did one pilsner and got a faint corn smell. It faded after a month in the bottle.
If you’re brewing lagers or pilsners, I’d stick with a chiller.
Hop alpha acids continue to isomerize into iso-alpha acids as long as the wort remains above 180°F. In a no-chill environment, the extended time in this temperature range increases the total International Bitterness Units (IBUs) compared to a rapid 15-minute chill.
Use the cube to control fermentation timing. If you brew on a Sunday but can’t pitch yeast until Friday, the wort stays safe in the sealed cube.

Plate and Counterflow Chillers: Professional Speed but High Infection Risk
These are the chillers you see in commercial breweries.
Wort flows through one set of channels while cold water flows through another set, separated by thin metal plates or walls.
The two liquids move in opposite directions (counterflow), which maximizes the temperature difference.
The result is that you can cool 5 gallons in under 5 minutes. It’s absurdly fast.
I don’t own one because I can’t justify the cost (they start around 150 dollars) and I’m terrified of the cleaning.
But I’ve used one at a friend’s nanobrewery, and the speed is addictive.
You go from boiling to pitching temperature in the time it takes to set up a fermenter.
The efficiency comes from the high surface area.
A plate chiller has dozens of thin plates stacked together, each one transferring heat.
The wort flows in thin films, which means every molecule is close to a cold surface.
The problem is that you can’t see inside.
If you get a protein clump or a hop particle stuck in there, it becomes a bacterial hotel.
The channels are narrow (maybe 2 to 3 millimeters), so anything that gets stuck is hard to flush out.
The cleaning protocol is brutal.
You have to backflush with hot water, then run a caustic cleaner (like PBW), then rinse, then run an acid cleaner (like Star San), then rinse again.
If you skip a step, you risk infecting every batch you make.
I’ve talked to brewers who swear by plate chillers and brewers who’ve given up on them after getting three infected batches in a row.
The common thread is discipline.
If you’re the kind of person who cleans equipment immediately after use, you’ll be fine.
If you’re the kind of person who leaves the chiller on the shelf for a week, you’re going to have problems.
The other issue is flow rate matching.
If your water pressure is too high, the wort doesn’t have enough time in the chiller to cool down.
If your wort flow is too fast, you have the same problem.
You need to dial in both flows so they balance. Some plate chillers have built-in thermometers to help you adjust.
The cheap ones don’t, so you end up guessing.
If you buy a plate chiller, get one with removable plates. The sealed units are impossible to inspect.
Water Conservation: Recirculating Chiller Water
I hate wasting water.
When I first started brewing, I dumped 20 gallons down the drain every time I chilled a batch.
The water coming out of the chiller is warm, not hot. It’s perfectly good for other uses.
I started catching it in a bucket and using it to water the garden.
Then I got smarter and ran a hose directly from the chiller output to a rain barrel.
Now I use that water for cleaning or for the next brew day.
The next step was recirculating.
Instead of running tap water through the chiller once and dumping it, you pump the same water through a loop.
You need a reservoir (I use a 10-gallon cooler filled with ice water), a small pond pump, and some vinyl tubing.
The pump pulls water from the cooler, sends it through the chiller, and returns it to the cooler.
The water gradually warms up, but you can keep it cold by adding ice or frozen water bottles.
I tested this setup against straight tap water.
With tap water at 60°F, I cooled 5 gallons in 15 minutes and used 18 gallons of water.
With the recirculating system and ice water, I cooled 5 gallons in 20 minutes and used 10 gallons of water.
The trade-off is time versus water.
If you live somewhere with droughts or high water bills, the extra 5 minutes is worth it.
You can also route the warm water to appliances.
I’ve run the chiller output directly into the washing machine while it fills.
The warm water (around 90°F) is fine for a normal wash cycle, and it saves the water heater from working.
I’ve also filled the dishwasher reservoir.
The only rule is to keep the hose clean; you don’t want wort-contaminated water going into your laundry.
Freeze a dozen water bottles the night before you brew. Toss them into the recirculating cooler as the water warms up.
Pre-Chillers: Dealing with Warm Groundwater in Summer
This is a problem I didn’t know existed until I tried to brew in July.
My tap water comes out at 75°F in the summer.
If I run that through an immersion chiller, the wort only cools down to about 80°F.
That is too warm to pitch most yeast strains.
I was stuck. I couldn’t get below groundwater temperature without adding ice directly to the wort or waiting hours.
The solution is a pre-chiller.
It’s a second coil that sits in an ice bath before the main chiller.
You run tap water through the pre-chiller first, which cools it down to near freezing.
Then you run that cold water through the immersion chiller.
The wort sees 35°F water instead of 75°F water, and it cools fast.
I built one out of 10 feet of copper tubing coiled inside a 5-gallon bucket.
I fill the bucket with ice and water, drop the coil in, and connect it inline before the main chiller.
The tap water gets chilled in the pre-chiller, flows into the immersion chiller, cools the wort, and exits warm.
The ice bath gradually melts, but it lasts long enough to cool one batch.
The downside is that you need a lot of ice-about 10 pounds per batch.
I freeze water in old milk jugs and use those instead of buying bagged ice.
It’s cheaper and I can reuse the jugs.
Some people use a chest freezer with a temperature controller to make a giant ice bank, but I don’t have the space.
Another option is to chill the wort partway with the immersion chiller, then transfer it to a fermenter sitting in a tub of ice water.
Let it finish cooling overnight. This is halfway between immersion chilling and no-chill.
It works, but it adds steps.
If you’re using a pre-chiller, monitor the temperature of the water coming out of it. The goal is to see output water below 40°F.
Cooling Fast (Or Not At All): Picking the Right Method
I don’t think there’s one correct way to chill wort.
It depends on your water situation, your budget, and how much you care about speed.
If you have cheap cold tap water and you want simplicity, use an immersion chiller and stir the wort.
If you live somewhere dry and you hate wasting water, try no-chill.
If you’re brewing 10-gallon batches or running a small brewery, invest in a plate chiller and commit to cleaning it properly.
I rotate between immersion and no-chill depending on the beer.
For hoppy ales, I immersion chill because I want to lock in the hop character.
For dark beers or session ales, I no-chill because the extra bitterness doesn’t hurt and I save 20 gallons of water.
I haven’t bought a plate chiller yet because this is a hobby, but if I ever scale up, that’s the direction I’ll go.
The data that matters is time in the danger zone.
If you can get your wort from 200°F to 80°F in under 30 minutes, you’re probably fine.
If it takes 2 hours, you’re rolling the dice.
Measure your cooling curve once and you’ll know if your method is working.
I keep a log of every batch. The ones that cooled fast taste cleaner.
The ones that sat warm for hours have a slight funk. The difference is small, but it’s there.
If you want to optimize, the biggest gains come from moving the wort, increasing surface area, and maximizing the temperature difference.
Everything else is marginal. Don’t overthink it. Pick a method, measure it, and adjust.
Conclusion
Wort chilling is a critical intersection of thermodynamics and microbiology.
Whether you choose the simplicity of a stirred immersion coil, the water efficiency of no-chill brewing, or the professional speed of a plate chiller, the objective remains the same: minimizing time in the microbial “danger zone”.
By understanding how flow rate, surface area, and temperature differentials impact heat transfer, you can choose the method that best fits your regional water constraints and specific beer styles.
Cooling Efficiency Comparison
| Method | Time (5 gal) | Water Use | Infection Risk | Cost |
|---|---|---|---|---|
| Immersion (still) | 30 min | 20 gal | Low | $40 |
| Immersion (stirred) | 15 min | 18 gal | Low | $40 |
| No-Chill | 12 hours | 0 gal | Very Low | $15 |
| Plate Chiller | 5 min | 15 gal | Medium-High | $150+ |
| Recirculating Immersion | 20 min | 10 gal | Low | $70 |
References
- Palmer, J. (2017). How to Brew: Everything You Need to Know to Brew Great Beer Every Time. Brewers Publications.
- No-Chill Brewing Techniques. Community Research, Australian Homebrewers Forum.
- National Institute of Standards and Technology (NIST). “Thermodynamic Properties of Water.”